Preparatory Work 1
Why ROS2?
ROS2, or Robot Operating System 2, is the successor to ROS1, featuring enhanced capabilities. Simply put, ROS2 is a collection of tools and libraries that provide a standardized middleware for developing robotic applications, promoting code reuse and efficiency. ROS2 is particularly well-suited for building scalable and complex robotic systems that require robust communication, such as those with multiple sensors and actuators.
Here are some key benefits of using ROS2:
Code Separation: Enhanced modularity and reusability
Communication Tools: Simplifies interactions between subprograms
Tools and Libraries: Offers many ready-to-use resources
Language-Agnostic: Supports multiple languages, primarily Python and C++
Improved Performance: Better scalability, real-time capabilities, and security over ROS1
Selecting a ROS2 Distribution
ROS2 is released through distributions, which are collections of ROS2 packages and tools, on an annual basis. When starting a ROS2 project, the first decision you need to make is which distribution (or “distro”) to use. How should you choose? The key distinction to understand is that ROS2 alternates between Long-Term Support (LTS) versions, which receive 5 years of support, and non-LTS versions, which are supported for 2 years.

Non-LTS versions are primarily intended for testing new features and tools and are generally not recommended for starting new projects. Instead, LTS versions are preferred, especially one that has been released for at least a few months, to ensure stability and the availability of necessary resources. Additionally, each ROS2 distribution is adapted to work with specific operating systems, most commonly the latest Ubuntu LTS release. The official ROS2 documentation provides the End of Life (EOL) date for each version, indicating the period during which stability and maintenance are guaranteed.
Key points to consider when choosing a distribution:
EOL Date: Ensure the distribution will be supported for the duration of your project
LTS Version: Opt for an LTS release, preferably one that has been available for several months
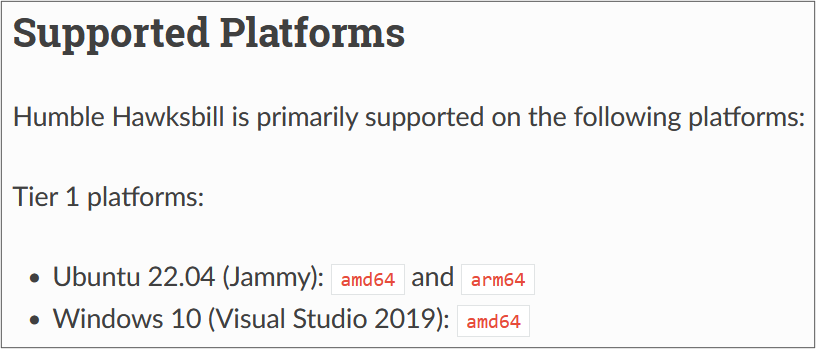
Supported Platform: Verify that the “distro” is compatible with your OS, typically Ubuntu LTS
For this course, we will use the Humble Hawksbill distribution, as it meets all of these recommendations. It is an LTS version, supported until May 2027. However, the best-supported platform for this distribution is Ubuntu 22.04 (Jammy Jellyfish), which could be a critical consideration for the course. In the next section, we will explore how to address this issue.
Why Docker?
In the previous section, we identified a potential issue with the ROS2 Humble distribution, which requires a specific operating system. In our case, the most suitable platform is Ubuntu 22.04. But how can we all work with Ubuntu on our own computers, regardless of our current setup? This is where Docker comes in.
Docker is a platform that allows you to package and run applications in isolated environments called containers. It ensures that the software behaves consistently, no matter where it is run, by providing everything the application needs, including the OS, libraries, and dependencies.
But how does Docker achieve this?
Docker Image: An image is essentially a blueprint for a container. It contains the necessary software, dependencies, and system configurations. Think of it as a snapshot of a specific environment, such as Ubuntu 22.04 with ROS2 pre-installed. When you want to run an application, Docker uses this image to create a container.
Docker Container: A container is an instance of an image. It is a lightweight, isolated environment where your application runs. The container shares the OS kernel with your host machine but remains isolated in terms of processes, file system, and network settings. This ensures that the container runs in a clean, consistent environment without interfering with your local setup.
In conclusion, Docker allows us to work in a clean, reproducible environment perfectly suited for our ROS2 application. For easier management, we willl use Docker Desktop, which provides a more user-friendly interface for handling containers.
In the next section, you will see the steps needed to access an Ubuntu desktop directly from your browser using Docker.
Installing Docker Desktop
Warning
Before starting the installation, make sure you have enough disk space. The full setup (Docker Desktop + Docker image) will require approximately 10GB of storage, so check your available space before proceeding.
Install Docker Desktop
Follow the instructions for installing Docker Desktop based on your operating system:
Windows: Install Docker Desktop on Windows
Need help?
If you encounter any issues during installation, please do not hesitate to contact us.
Configure Docker
Once the installation is complete,
Acceptthe Subscription Service Agreement to proceed. You can then skip all the following questions, as creating an account is optional and not required.Pull the Docker Image
On the Docker Desktop, use the search bar to find the image named luky005/ros2_basics and pull it.

Open the search bar

Find and pull the image
Locate the Image and Run the Container
Once the image is downloaded, find it in the Images section on the left sidebar. Then, start the container by clicking the
▶symbol.
Locate and run the image
Set Optional Settings and Launch the Container
Open the Optional settings tab and fill in the following fields:
Set the container name to ros2_basics
Set the port to 6080
Then, click the
Runbutton to launch the container.
Open the optional settings

Set the settings and run
Access Ubuntu
After the container has launched, you can access Ubuntu in your preferred browser at http://localhost:6080, or you can directly access the port through Docker Desktop.

Access the port directly from Docker Desktop
Warning
Running the container in Safari may result in slower performance. For a smoother experience, we recommend using Firefox or Google Chrome.
Connect to Your Desktop
Finally, click on
Connectto access your new desktop for these lab sessions.
Connect to Ubuntu desktop
Ubuntu MATE 22.04 desktop
Important
If you are logged out of the Ubuntu desktop due to inactivity, the following login information may be helpful: Username: ubuntu | Password: ubuntu
Exit and Stop the Container
Once you have finished working in the environment, be sure to disconnect from the VNC server and stop the container in Docker Desktop.

Disconnect from the VNC server

Stop the container
Important
To access the Ubuntu desktop in the future, navigate to the Containers section on the left sidebar. Click the ▶ symbol next to your container to start it directly.

Locate and run the container
Additionally, you can open your browser directly to http://localhost:6080 by clicking on the 6080:80 port located on the left side of the ▶ symbol. This allows you to quickly connect to the VNC server.

Access the port directly from Docker Desktop
Exploring Tools
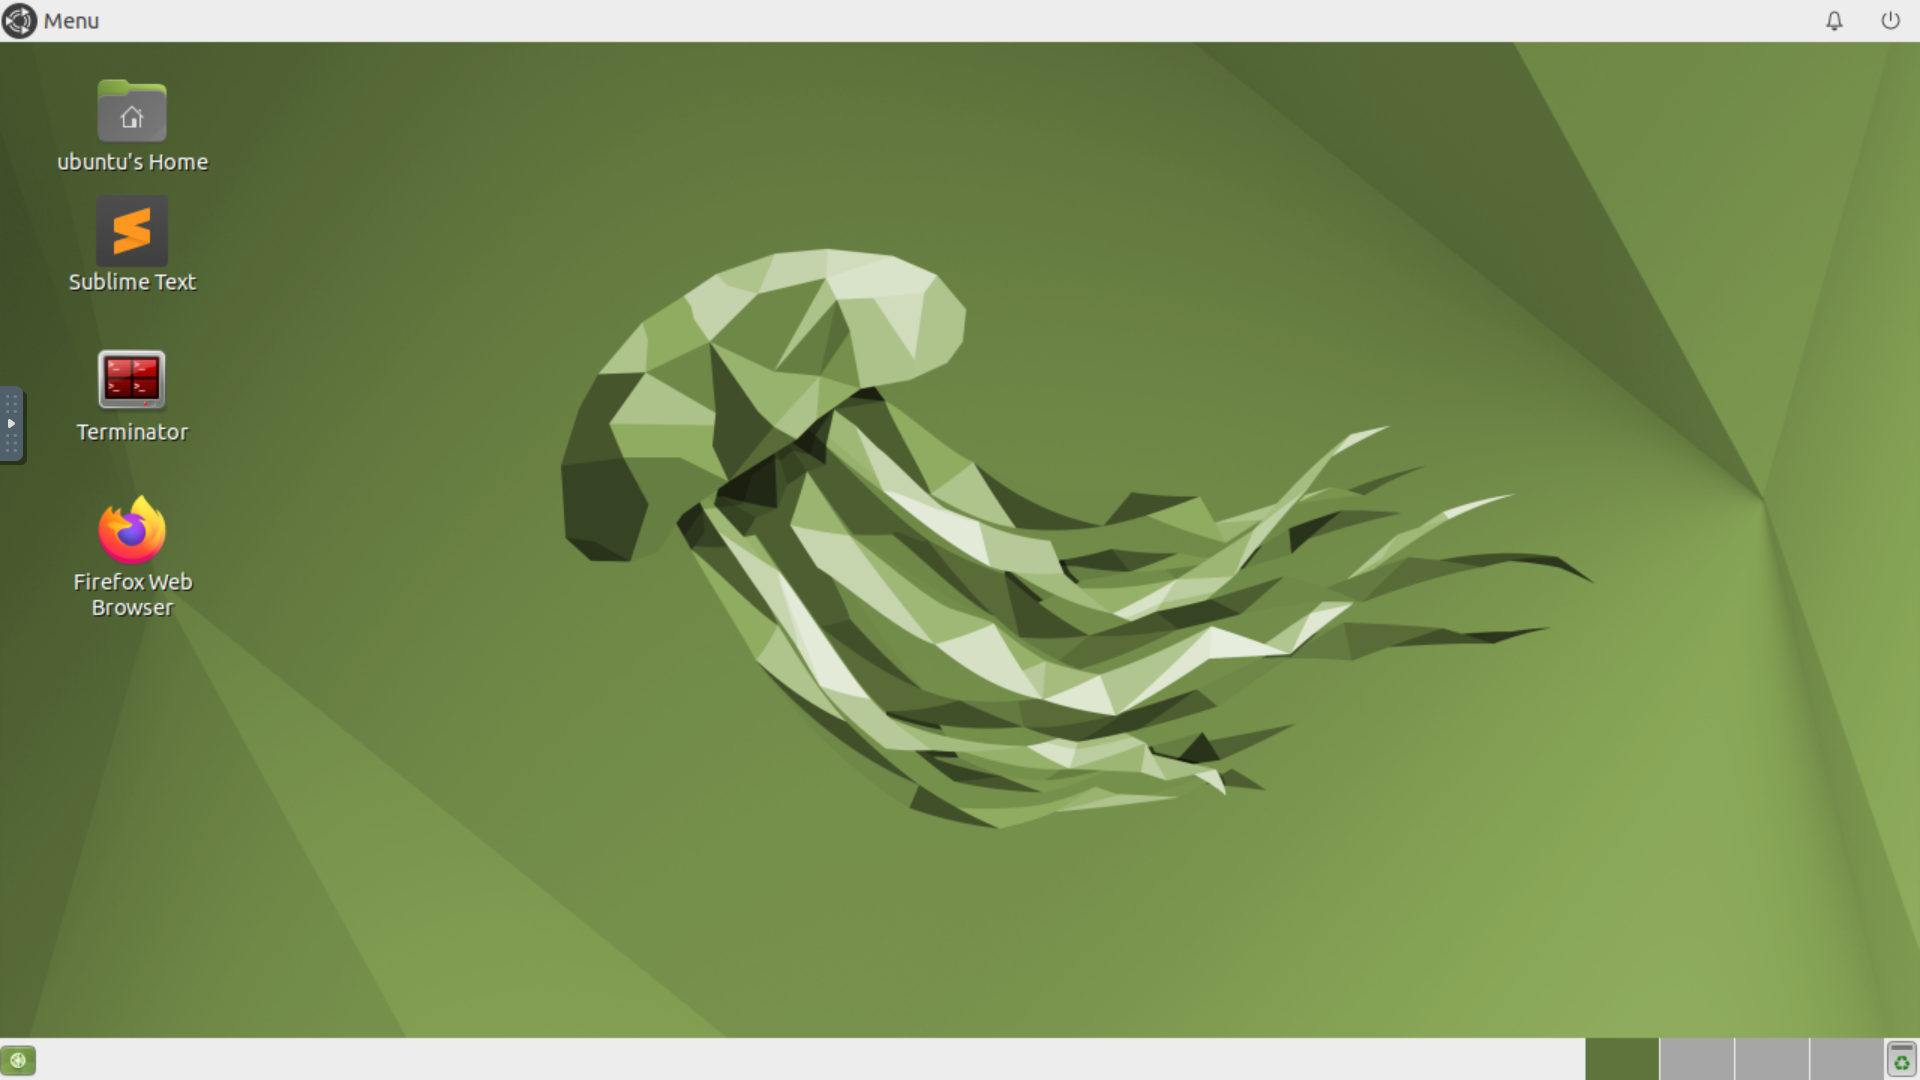
In the container you just installed, we have preconfigured an Ubuntu environment with the ROS2 Humble distribution, along with several essential tools. On the desktop, you will find Firefox, Sublime Text, and Terminator. Below is a brief overview of each application:
Firefox: This web browser will enable you to access online resources, including the ROS2 Basics documentation.
Tip
We recommend using Firefox within the Ubuntu desktop for easier copying and pasting of code snippets from the documentation. If you need to copy from outside the Docker container, use the clipboard option in the noVNC menu on the left side of the desktop window.
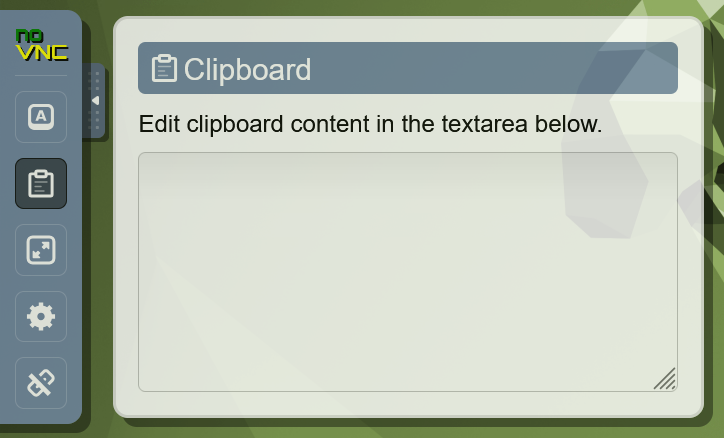
Clipboard option in the noVNC menu
Sublime Text: This lightweight text editor is the recommended choice for writing code in this course, as its stability in the Docker environment has been proven.
Terminator: This enhanced terminal emulator allows you to split your screen and manage multiple terminal sessions simultaneously. This feature is especially useful when working with ROS2, as you will see in session 1.
Here are some useful shortcuts for splitting the terminal:
Ctrl+Shift+O: Horizontal splitCtrl+Shift+E: Vertical split
You can also right-click on the Terminator window to access similar options for splitting the terminal.
Additionally, here are some key shortcuts that will be especially handy while working in an Ubuntu terminal:
Ctrl+Shift+C: CopyCtrl+Shift+V: PasteCtrl+C: Kill current processtab: Autocompletetab+tab: Show autocomplete suggestions▲or▼: Scroll through command history
Note
If you prefer using different tools, you are welcome to download and install them on your desktop. Customize your workspace to suit your preferences and workflow!
Learning Basic Linux Commands
As we prepare for our practical lab sessions with ROS2, being familiar with the terminal will be helpful. Here are some key Linux commands you will find useful throughout this course:
Essential Commands
mkdir <directory>: Create a new directory
cd <directory>: Change the current directory
ls: List directory contents
touch <file>: Create an empty file
chmod +x <file>: Make a file executable
Useful Commands
pwd: Display the full path of the current working directory
cat <file>: Display file contents
nano <file>: Basic text editor for editing files
cp <source> <destination>: Copy files or directories
mv <source> <destination>: Move and/or rename files or directories
rm <file>: Delete files
rmdir <directory>: Remove an empty directory
rm -r <directory>: Recursively delete directories and contents
Note
For more information on the Linux commands, refer to the official Ubuntu tutorial. At the very least, we highly recommend reviewing the following page to get familiar with the cd command and learn how to easily navigate between directories.
To reinforce your understanding of these commands, we invite you to participate in a command-line challenge designed to practice your skills!
Command-Line Challenge
Objective
Explore a virtual file system and complete tasks using the commands you have learned.
Instructions
Setup the Challenge Environment
Open your terminal and create a challenge directory:
mkdir command_challenge
cd command_challenge
Inside command_challenge, create a basic structure:
mkdir -p challenge/{documents,images,videos}
touch challenge/documents/{notes.txt,tasklist.txt}
touch challenge/images/{pic1.jpg,pic2.jpg}
touch challenge/videos/video1.mp4
Starting the challenge
You are now in the command_challenge directory. Your objective is to complete the following tasks using your knowledge of Linux commands. Before reviewing the solutions, try to figure out the necessary commands on your own. Good luck!
Tip
Before and after each command, use ls to observe the changes in your directory.
Tasks
Navigate to the documents directory
cd challenge/documents
List the contents of the documents directory
ls
Create a new text file called summary.txt
touch summary.txt
Write a brief summary text in summary.txt, then save and exit
nano summary.txt
Example content: “This is a summary text.”
To save, press: Ctrl + S
To exit, press: Ctrl + X
Display the contents of summary.txt
cat summary.txt
Return to the main challenge directory
cd ..
Check the full path of your current working directory
pwd
Navigate to the images directory
cd images
Remove pic2.jpg
rm pic2.jpg
Go back to the challenge directory and remove the videos directory
cd .. && rm -r videos
Copy pic1.jpg from the images directory to the challenge directory
cd images/ && cp pic1.jpg ..
Rename pic1.jpg to my_pic.jpg in the challenge directory
cd .. && mv pic1.jpg my_pic.jpg
Change the permissions of my_pic.jpg to make it executable
chmod +x my_pic.jpg
Clean up your challenge by correctly removing the command_challenge directory
cd ../.. && rm -r command_challenge